This application was inspired by Mire De Collimation program written by Gilbert Grillot and Al's Collimation Aid. I combined best features of both and addes some of my own. Purpose of this program is not to reinvent the wheel, but rather to learn new technologies, become better at colimating my telescope and to learn something new.
Main purpose of this program is to help you with aligning optical elements of your telescope such as secondary mirror, primary mirror, focuser, etc.
Collimation Circles application was tested on Windows 10 and 11, Ununtu Linux 22.04.1 LTS (Wayland) and Raspberry PI OS Bullseye. It should work on macOS too.
Features
- support multiple pattern shapes (circle, spider, screw, clip and bahtinow mask)
- user interface for managing list of patterns
- scaling up or down of whole setup
- rotation of whole setup
- transparent background
- fully customizable patterns: radius, thickness, color, spacing, rotation, label
- support for profile saving and loading (JSON files)
- precise position control with keyboard
- multiple platform support (Windows, Linux, macOS)
1. Preparations
For collimation circles app to help you with collimation process you'll need:
- Raspbery Pi HQ Camera (imx477) with 6mm lens (in my case) attached to the focuser
- I have designed 3D printed camera case that can be attached directly to focuser. You can get it on thingverse.com or printables.com
- computer displaying live image from camera
- Collimation Circles app running on your computer to overlay over live stream from camera
- screwdriver
- sheet of paper to block primary mirror, and second colored (green in my case) sheet for better contrast
- marked primary mirror center spot
- reflective collimation cap
- I made mine from 35mm film canister with hole in the center of the cap. Then I glued shinny washer to the bottom of the cap and glue everything back to canister
I recomend you to read excelent AstroBaby Collimation tutorial. All Images in this article are generated following procedure described in the tutorial.
2. Align secondary mirror to center of focuser tube

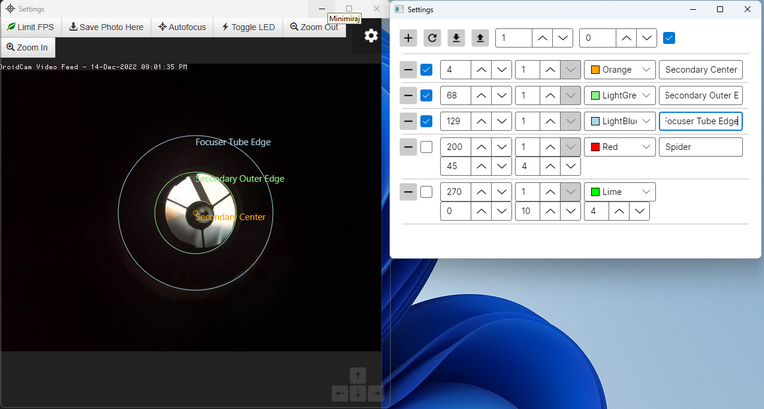
In this stage our goal is to center secondary mirror to center of focuser tube. Image shows that secondary mirror is not at exact center of focuser tube. In this stage it's very important to block primary mirror reflection as described in tutorial.
3. Align secondary mirror to primary mirror
After first step you will probably see something like this:

From that image you can see that secondary mirror and primary are not aligned. Great method to align secondary mirror is, to tilt it until you get all primary holder clips into view (as shown in next step).
Remember to tighten all the screws on secondary mirror and check live image again.
4. Primary mirror alignment
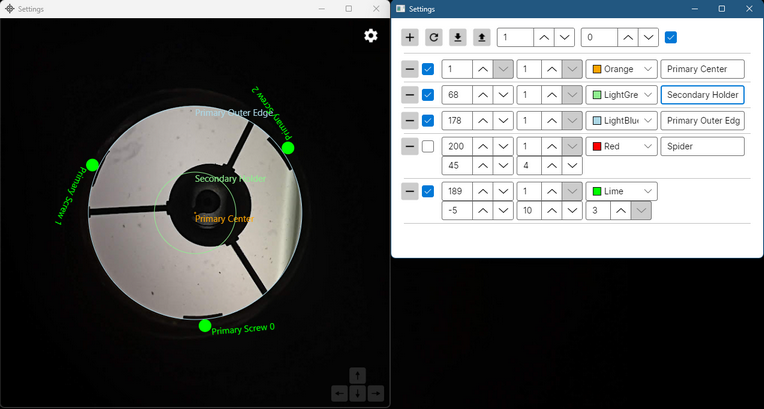
Last step is to align primary mirror to the optical center as close as possible. Image below shows really bad primary mirror alignment.

In this step you unscrew locking screws of primary mirror and using collimation screws to align primary mirror center to center of reflective collimation cap. When finished you should see something like that.

5. Star test
Final stage is to perform star test (as described in AstroBaby Collimation tutorial) and make some final tunning of primary mirror. If you like this application, please feel free to leave me a comment below.
Clear skies!
Add comment
Comments
I just got an old (never opened) PI3, 32GB computer up and running withunder Raspian loaded by the NOOBS app provided with the CANAKIT. I'm expecting the PI HQ camera and lens tomorrow, and am hoping to print your M42 threaded case for the camera. I assume that Collimation Circles is intended to run on the PI since I don't see how to interface the camera to my windows laptop or Ubuntu desktop? Can you give me any instructions for loading CC on RASPIAN and then instructions for controling the camera in your program? Thanks,
John
Hi John! Thank you for showing interest in Collimation Circle app. Collimation circle app was develop using .NET Framework so it should run on every system, that can run .NET Framework. I successfully testet it on my Raspberry PI 4 and Raspbian OS Bullseye. I suggest you to upgrade your RP to very last version of OS. You can find detailed instructions on how to install Collimation Circles on Raspberian OS here: https://github.com/sajmons/CollimationCircles. For video stream from your camera you can simply use terminal command: libcamera-hello -t0 or even better you can use app that comes with Picamera2 library here: https://github.com/raspberrypi/picamera2/blob/main/apps/app_full.py and run it from your terminal with: python app_full.py command. If you need anything else, please let me know.
Thank you for your response and for writing this excellent software. I got Bullseye (latest 64 bit Raspian OS) working on the Pi 3, but have not been able to get the .net SDK loaded. When I follow your Raspberry instructions on github it seems to work up to the installation of the 7.0 SDK. On the step: sudo apt-get install -y dotnet-sdk-7.0, I get an error stating that the dotnet-sdk-7.0 package was not found in glob or regex, even though the wget and install of the microsoftt.deb package seemed to work. I also tried manually dowloading and installing the microsoft package - no joy, same error on trying to install the sdk. Any thoughts?
Also I printed off your cover for my hq camera and the square cutouts for the board and back-focus are a little too small, as are the M42 threads. I scaled the case up to 107% with the Prusa slicer, but that is too big. I'm trying 101% in x and y, and 100% in z now and will see how it works. This may be an issue with my Ender 3 scaling . I've had trouble with threads before. Thanks again,
John
@John You are absolutelly right. Instalation procedure you mentioned was intended for x64 arhitecture only. I have updated instructions. There is new Raspbian OS Bullseye ARM procedure. Please follow this one.
As for camera case... I actually dont have 3D printer myself, so I havent been able to test it out. I have ordered my print on craftcloud.com and I expect it to arrive very soon. When I get it, I'll make necessary adjustments and post new version.
Nice tool ! I'll try to use it with my old SCP900 camera to collimate both telescope, a Celestron 114SLT and a SW-130-PDS.
Good job, thanks again.
Vincent.
Thank you Vincent. And your welcome! I'm glad that you find my application useful. Please spread the word about it.
bonjour,
Possible de collimater un Epsilon 180ED, en tenant compte de l'offset du secondaire.
Merci pour votre réponse
I think you could run into troubles here. This telescope has corrector integrated in the rack-and-pinion focuser, and I don't know what effect it has on final optical path. Because of that integrated corrector you could have hard time to recognize each part of your optical path, but it could still work. Try for yourself and leave some comment how it went.
This seems like exactly what I'm looking for as collimation is always a struggle for me. I have an RC8 and a 130-PDS newt (for astrophotography). Looking at the requirements, I would need to find somewhere to get the printing of the camera attachment, right? I don't have any 3D printing experience, so I'm also guessing I just download the file and provide it to someone to print it for me?
Thanks!
Yes, I understand you perfectly Danny! I to dont have any experiance with 3D printing, but that is not issue at all. You can use one of the 3D printing service out there. Personally I'm using https://craftcloud3d.com/. Use my referal code to get 10% discount REFCIS3WNEI.